Guitar Tabs Notation
This guide covers the key elements of guitar tabs notation, including markings like slides, bends, and hammer-ons, and how to use them effectively. You’ll also learn how to apply these notations in My Guitar Tabs, making it easy to create and edit detailed and easy-to-read tablatures.
Guitar Techniques
This section explains common guitar techniques like sliding, bending, and muting, and how they are represented in tablature.
In My Guitar Tabs, you can easily add these markings using the Markings on the Virtual Keyboard.
Muted String
To play a muted string, lightly touch the string with your finger to dampen the sound, then pluck it. This produces a percussive, muted sound rather than a clear note.
To notate a muted string, use an "X" in place of a number on the tablature to indicate the muted pluck.
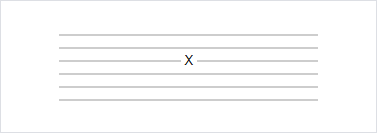
In My Guitar Tabs, you can add a muted string by pressing X on your keyboard or pressing the X button from the Virtual Keyboard.
Hammer-on
To play a hammer-on, strike the first (lower) note with one finger, then sound the second (higher) note with another finger on the same string without picking it.
To notate a hammer-on, use an arc over two notes on the same string, with the second being a higher note.
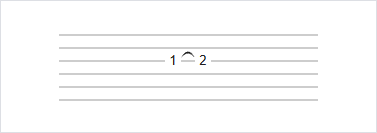
In My Guitar Tabs, you can add a hammer-on by pressing H on your keyboard, or pressing the hammer-on marking button from the Markings Keyboard, the Marking Shortcuts Bar, or the Markings suggestions.
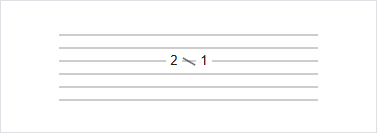
Pull-off
To play a pull-off, place both fingers on the notes. Strike the first (higher) note, then pull your finger off to sound the second (lower) note without picking it again.
To notate a pull-off, use the same arc as a hammer-on, but with the first note being higher than the second.
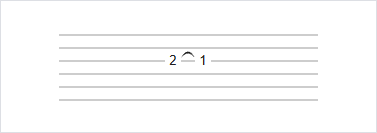
In My Guitar Tabs, you can add a pull-off by pressing P on your keyboard, or pressing the pull-on marking button from the Markings Keyboard, the Marking Shortcuts Bar, or the Markings suggestions.
Slide
To play a slide, strike the first note and slide your finger to the second note.
To notate a slide, use an inclined line connecting the two notes. The direction of the line indicates the slide direction: up (from a lower to a higher note) or down (from a higher to a lower note).
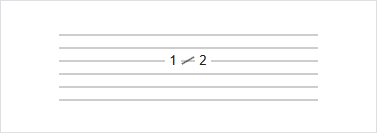
In My Guitar Tabs, you can add a slide by pressing S or / on your keyboard, or pressing the slide marking button from the Markings Keyboard, the Marking Shortcuts Bar, or the Markings suggestions. The app will automatically add the appropriate inclination based on the adjacent notes.
Vibrato
To play a vibrato, rapidly bend and release the note to create a vibrating effect on the string.
To notate a vibrato, use a wavy line above the tablature.
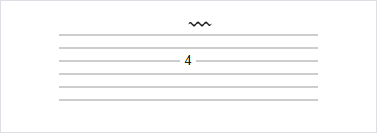
In My Guitar Tabs, you can add a vibrato by pressing V on your keyboard, or pressing the vibrato marking button from the Markings Keyboard, or from the Marking Shortcuts Bar. Vibrato can also be applied in one go to a whole Range Selection.
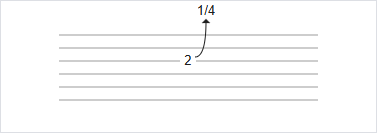
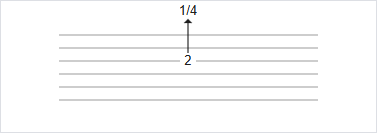
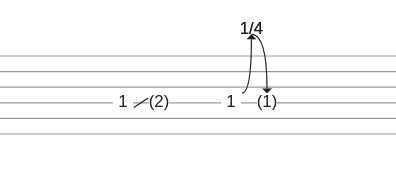
Bending
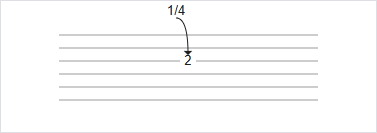
To play a bend, push the string upward or downward to raise the pitch of the note.
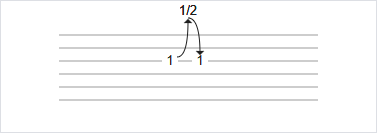
To notate a bend, use an arrow with a number to indicate the bend’s interval: a quarter step (1/4), half step (1/2), or a full step (1).
To notate a pre-bend, use a straight line to show the string is bent before it is struck.
To notate a bend release, use a downward arrow to show the string is released back to its original pitch.
Bending and release markings can be combined through different notes:
In My Guitar Tabs, you can add bending by pressing B on your keyboard, or pressing the bend marking button from the Markings Keyboard, the Marking Shortcuts Bar, or the Markings suggestions.
Additionally, you can add bend-down and pre-bend pressing N and M respectively on your keyboard, or pressing the bend down and pre-bend marking buttons from the Markings Keyboard, or the Markings suggestions.
You can adjust the bend interval by pressing the bend marking button repeatedly.
Stroke
Strokes in guitar tablature indicate how to pluck or strum the strings, either upwards or downwards.
Downstroke
To play a downstroke, move your pick or hand from the top string toward the bottom string in a downward motion. This produces a strong, accented sound typical in rock and rhythm playing.
To notate a downstroke, use the ⌄ symbol under or near the note or chord to indicate the downward motion.
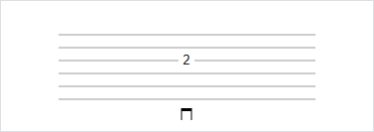
In My Guitar Tabs, you can add a downstroke by pressing D on your keyboard, or pressing the downstroke marking button from the Markings Keyboard.
Upstroke
To play an upstroke, move your pick or hand from the bottom string toward the top string in an upward motion. This creates a lighter sound and is often used in alternate picking and rhythmic strumming.
To notate an upstroke, use the ∧ symbol under or near the note or chord to indicate the upward motion.
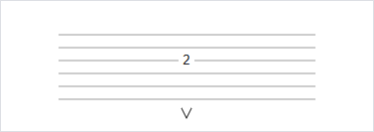
In My Guitar Tabs, you can add an upstroke by pressing V on your keyboard, or pressing the upstroke marking button from the Markings Keyboard.
Harmonics
Natural harmonics are notated with a diamond < > surrounding the note:

In My Guitar Tabs, you can add or remove a harmonic by pressing < or > on your keyboard, or pressing the harmonics marking button from the Markings Keyboard.
Palm Mute
To play a palm mute, use the edge of your picking hand on the strings near the bridge to partially silence the vibration. This slightly shortens the sound of notes or chords being played.
To notate a palm mute, use the text P.M above the tablature along with a line extending over the notes that are played muted.
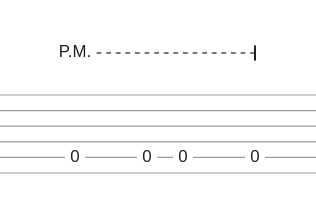
In My Guitar Tabs, you can add a palm mute by pressing the P.M. button from the Markings Keyboard.
Ghost Notes
To play a ghost note, lightly touch the string to mute it, then pluck to create a soft, percussive note.
To notate a ghost note, place the fret number inside parentheses on the tablature.
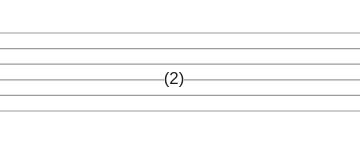
In My Guitar Tabs, you can add or remove a ghost note by pressing G on your keyboard, or pressing the ghost note marking from the Markings Keyboard.
Ghost notes can be combined with other markings such as slides or bends while keeping the parentheses notation.
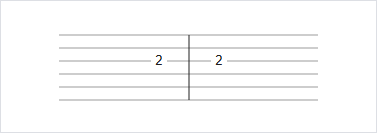
Bars
Bars (or measures) are marked by vertical lines placed along the tab to indicate sections, repetitions, and endings.
In My Guitar Tabs, you can easily add these bars using the Bars on the Virtual Keyboard.
Here’s a guide to the most common bar markings:
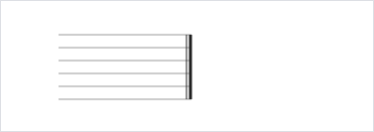
Bar line
A single vertical line used to denote the end of a bar or measure. It helps organize the music into manageable sections and shows the timing structure of the piece.
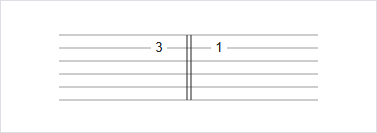
Double Bar
A double vertical line used to indicate the end of a section within the song. This is often used to separate different musical parts, such as the verse and chorus.
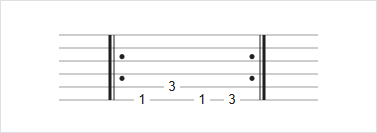
Repeat Bar Lines
Repeat bar lines mark sections of music that need to be played more than once, such as a catchy riff or melody. These are represented as a double bar with two dots on either side.
- Start Repeat: Appears at the beginning of the section to repeat.
- End Repeat: Appears at the end of the section to repeat.
End
A double bar marking the end of the song, ensuring a clear conclusion to the piece.
In My Guitar Tabs this is automatically added to your tabs after you finish editing,